Showing posts with label DIY Projects. Show all posts

Monday, March 11, 2013

DIY Framed Silhouette

I have decided to continue doing pregnancy updates every other week because not much changes week to week now that I'm further along, so I will have the next one posted in a week.

***

I am currently coming down off of the high that was the weekend.  Saturday and Sunday it was beautiful and sunny!  and so warm!  It's still warm today, but it's supposed to cool down soon, so I'm trying not to get too bummed.

Anyway, my weekend was great!  I feel like I've kind of been in a funk all winter thanks to the winter blues and lack of sunshine and Vitamin D. So this weekend was a nice change!  On Friday night Luke went to the Cavs game, so I went to Chipotle and to see the new Oz movie with my parents.  We loved it!  Definitely worth seeing in 3D.


And then I spent the day Saturday shopping with my mother-in-law and sisters-in-law.  We went to Hobby Lobby, and I bought some things for a few nursery projects I've been wanting to do.  

The first project I've tackled is a framed animal silhouette.  It was a very simple DIY project, and took me about 10 minutes from start to finish.  I simply bought 2 different patterns of scrapbook paper that complimented one another - one for the background and one for the silhouette.  I googled the silhouette of a bird that I liked, printed it, cut it out, traced it onto one piece of scrapbook paper, cut that out, glued it onto the background paper, and framed it.  And just like that, Scarlett's first nursery project was complete!


I think we're doing mostly yellow and gray and maybe a little blue in the nursery, so I thought this was perfect.  It was an easy little project, and could be done with a silhouette of just about anything. 

It feels good to have one project completed.  Never mind that we have to completely clean out the future nursery, replace the carpet and light fixture, prime and paint the walls, buy furniture, organize her closet....etc.  I'm happily in denial about the amount of work that needs to be done now that my first cutesy project is done!  

Thursday, June 28, 2012

Patriotic Luminaries: A Pinterest Project

I few weeks ago, I saw the idea for Fourth of July luminaries on Pinterest, originally found here (this project was not my original idea, nor am I claiming that it was.  I just want to make sure I give credit where credit is due).  I had almost all of the supplies at home already, and the project looked very simple.  Done and done.

It really was that simple.  The only supplies I needed were:

  • A mason jar
  • A small candle to fit inside the jar
  • spray paint (I chose white so I can reuse the luminary at Christmastime, but red or blue would give it a more patriotic look)
  • Star stickers
  • Optional: some kind of cute string, yarn, or twine to tie around the top of the jar. 


And here's what I did:

1. Randomly stick the star stickers on the Mason Jar.  As many or as few as you want.

2. Spray paint the Mason Jar.  Make sure you hold the can back at a good distance to prevent drips.

3. Once the jar is completely dry, carefully peel the star stickers off.  Then tie a pretty little bow around the top if you feel so inclined...


And that's it!  Throw in a candle and you're good to go.  Perfect for Independence Day, or as I mentioned earlier, I'm breaking this out again for Christmas. 

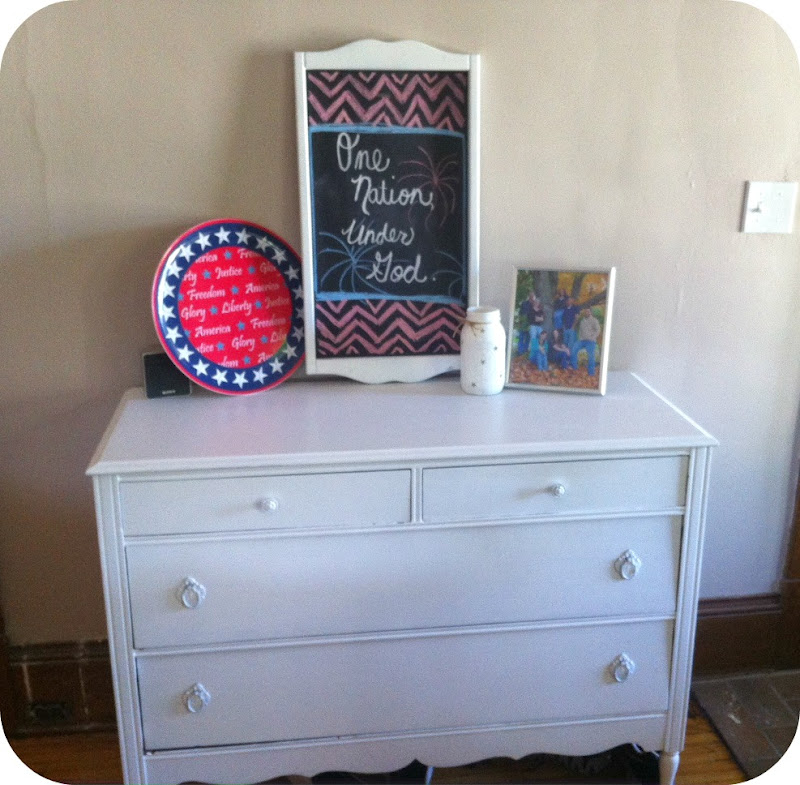
I put it right on my little entryway dresser, along with my patriotic plate and chalkboard. 

And yes, that is my quick, freehand attempt at patriotic chevron. Don't laugh too hard.  I think the "rough" look somehow works with my handmade chalkboard and luminary.
 

And just for fun, here it is in the dark.  My favorite part is that it casts little stars on the wall. Thank you, Pinterest!


Tuesday, June 5, 2012

DIY Plant Markers


I have a little herb garden out on my porch.  The other day I put some boring plant markers in, and called it a day.


But then I this happened...


I found these adorable alphabet stamps at Walmart for $.97!  I fell in love immediately, and knew I had to figure out a project for them, ASAP.

The next day, inspiration struck:  I could use them to make revamped plant markers!  

I used popsicle sticks and put a thin coat of white paint on them first.  then I used my little letter stamps to label them.


I kind of love the finished product


$.97, and these silly little letter stamps are my new favorite things!  I can't wait to figure out what to use them for next!

Tuesday, January 3, 2012

2011 Resolutions Revisited

In 2011 I made a big list of goals I wished to accomplish during the year. Resolutions, if you will. I didn't share it on the blog, because in years past I had failed miserably. Well, this year I did better than normal, so I thought I'd share now. I guess maybe keeping them secret all year was key??

1. Complete Project 365. Fail. I have tried this two years and failed both times during the summer. Clearly I am not cut out for it, and I've decided not to feel bad about it :-)

2. Read at Least 30 Books. I ready 26 out of 30, and that's pretty good considering the fact that I spent 15 weeks studying during every spare moment and couldn't read for leisure during that time.

3. Complete at least 6 DIY projects. Complete! I actually did 9:

Altered curtains (counting it!)

Made these frames, which I now hate, but that's not the point :-P

Julie's bridal shower banner

This dry-erase to-do list

Rolled paper flowers in frames...one of my favorite projects!

Rolled fabric flowers used for various things

My chalkboard menu


Painted dresser which I'm in love with

Poinsettia Wreath
Is it just me, or do they get better as the year went on? I hope that means my 2012 projects will be better still :-)

4. Lose 10 pounds. Well, I guess I kind of get half credit for this one. In the spring and summer I was doing great, counting calories, and swimming laps every day. I lost 9 lbs! ...and then gained them all back in the fall when I started drinking coffee (with lots of sugar and fancy creamers) and maybe eating a lot when the stress of studying became overwhelming as well. I really need to work on this.

5. Figure out what I'm going to do about the job situation. Complete! I knew I needed a change in my life, and I made it when I quit my job and went back to school full time!

6. Buy a dSLR camera and an iPhone. Half credit. I bought the iPhone but not the camera.

7. Finish reading the Bible. Fail. And to be honest I've really been struggling with my daily reading as well. I hope to improve in this area this year.

8. Cook/bake/make at least 30 new dishes. Complete! I actually made 34 brand new (to me) recipes last year! I think that's pretty great :-) I mostly have Pinterest to thank. I listed them with links and starred my top 10 favorites. Because I have OCD.


penne, sausage, and peppers dish
pretzel-Rollo sandwiches

I think I made out pretty well last year with my resolutions! The reason I made so many was so that I knew I'd at least accomplish a few of them ;-) I'm keeping it simple this year with my one, solitary resolution of recognizing God's blessings and giving thanks for them.

Monday, December 12, 2011

Right Brain and a DIY Project for Christmas

All semester, the left side of my brain was busy at all times. It was busy memorizing facts and being responsible and logical and organizing things.

The poor right side just didn't have a chance. There was no time to be creative.

Now that the semester is over, my right brain is in its element. I have been doing nothing but working on projects and decorating the house and writing blog posts. I guess it's making up for lost time.

Anyway, I've been busy getting the house ready for Christmas and completing my dresser project...

And on Friday night I got the urge to create something else....

I had found the idea for a Poinsettia wreath on Pinterest a long time ago. The original wreath can be found here along with a tutorial.

And here is my version:

I hung it right on the chalkboard I made over the summer. I usually use this as my menu chalkboard, but I just thought the wreath looked too perfect there.

Also, to get the handwriting to look nice, I printed out "Merry Christmas" in one of my favorite fonts on the computer. Then I colored the back of the piece of paper with white chalk, held the paper up to the chalkboard, and traced. It's a pretty easy way to transfer just about anything onto a chalkboard! I had to re-trace it with my chalk to make it dark enough, so it's definitely not perfect. But I kind of like the imperfections :-)

I gotta say, it has been really fun to be crafty and creative the past few days. Hopefully I can keep this up until next semester when I no longer have any free time!

Thursday, December 8, 2011

Dresser Makeover

I've been looking for a little table or dresser or something for our entrance hallway for awhile now.

I was garage sale-ing with my mom and sister in the middle of October when I found it: the perfect dresser.
My mom ended up buying it for me for my birthday because I loved it so much. It didn't look too bad when I bought it, except that it was a little dated, a little scratched, and a little dark for my taste.

All semester I had been dying to give the dresser a makeover. I never dreamed that it would take me until December to finish it! But when you have a 15-week semester crammed full of 16 credit hours, 39 quizzes, and 14 tests (yes, I counted) you just don't have time for extra things.

So yesterday, on the very day of my last final, I was able to complete my project. What a difference a few coats of white paint can make!

It feels so good to cross something fun off the to-do list. And I really like how it turned out. We needed something to fill that space, and the added storage will be great too.

No makeover is complete without the side-by-side before and after shots:

For the Christmas season I decided to put my Willow Tree Nativity on the dresser. I also found this awesome free printable and framed it. (I found it at the Jones Design Company website, but for some reason it won't load and I can't get the link! You can probably Google it and find it) I thought it was perfect to place right beside the manger scene.
Hopefully this will be a beautiful reminder to us of what Christmas is all about.

***

What a fun way to spend my first day of Christmas break! Other awesome things that happened yesterday include:
  • Discovering Temple Run on my phone.

  • Shopping with my mom at an adorable little five and dime store. They had the cutest window displays!

  • Chipotle with my husband to celebrate the end of the semester. And because I had been craving it for a week.
  • Modern Family
  • Realizing I'm not going to have to study for 4 weeks or more!
I can't wait to see what other fun things Christmas break will have in store! Happy Thursday!

Wednesday, July 20, 2011

DIY Dry Erase Board

I don't think I've blogged about my new, cute dry-erase board yet. I found the idea on Pinterest, which was originally posted from here

It was so easy to make. All you need is a picture frame, some scrapbook paper, and a dry-erase marker. I am going to use mine to write my to-do list for each season:

Not the best picture, but I promise it is cute in person :-) The brown scrapbook paper has tiny white dots all over it and I love it.

That picture was taken a month ago, and only a couple of items have been checked off since then. I better get to work if I want to accomplish all of this before the end of summer! Some of the items on the list are more wishful thinking, I guess :-)

I plan on changing the scrapbook paper for seasons and holidays. I just thought it was a fun way to keep me motivated :-)

Now with my menu chalkboard and dry-erase to-do list, my kitchen is full of organizational help. I need all the help I can get in that area!

Tuesday, June 21, 2011

Chalkboard Project

Yesterday I completed my 6th DIY project of the year, meeting the goal I set for this year in my New Year's Resolutions. And it's only June! I should have set a higher goal, but I'm just happy I met it. And I even have another craft in the wings, halfway completed too! It has been a crafty summer :-)About a week ago, I bought some supplies while out wedding shopping with Mom and Julie. I found this big, blue, wooden frame-type thing at Goodwill, and then bought some chalkboard spray paint at Michael's and some white spray paint at Flower Factory. And the idea for my chalkboard project was born.
The project couldn't have been simpler. I just spray-painted the frame white, then a few days later I taped off the white part when it was totally dry, and spray-painted the inside with chalkboard paint. (I tried to use foam core board for the inside, but it was too thick to fit inside the frame. But that's why it's in the picture).

I bought enough chalk to last me a lifetime at IKEA yesterday, and used it to turn my chalkboard into a menu to hang in my kitchen. I really like the finished product, and I think the frame looks soooo much better in white rather than blue!

(Wish I had better handwriting! :-P)

Next project in the works? A coffee filter wreath. I think it will look cute in our living room!

Thursday, June 2, 2011

DIY Rolled Fabric Flowers

Last week I made some rolled paper flowers from a tutorial I found on this website. And this week I made some fabric flowers from a tutorial I found on the same website...

These flowers are sooo simple to make, and they are so cute! Here is a link to the step-by-step instructions of how to make the little rosettes.

On Monday I had some spare time before a bonfire at my parents' house so I sat down with an old, cotton, white dress that I had never worn. I bought it because it was really inexpensive, and it just never looked quite right on me. So I cut it into a bunch of multi-sized strips and set about rolling each strip into a little flower. It seriously took no more than a minute to make each one.

Once I had made all the flowers, I had to figure out what to do with them. First I used some to embellish a boring, pink t-shirt I had bought on clearance at Old Navy for $4. I just sewed them right on the pocket

Before:

After:


Then I thought the only thing cuter than adding them to a shirt would be to make little hair clips and headbands out of them. Here's a picture of one that I glued to a bobby pin (I also sewed a little piece of fabric tightly behind the pin to make sure it stayed connected).

I wore it in my hair to work today and got lots of compliments. I'm not sure, but I think this may be the beginnings of my etsy shop! Stay tuned ;-)

I have so many ideas for these cute flowers! I can't wait to make more in all kinds of different colors! I want to attach some to the lamp in my bedroom, sew some to my bags, make some kind of pillow embellished with these flowers...I could go on and on.

So now I've completed 5 DIY projects this year, and my goal was 6! Yay! I'm almost there, and it's only June!

Oh...and that stencil project in the bedroom I have been talking about?

Yeah, about that...I think I've changed my mind about the whole thing, and instead, I'm thinking about painting the bedroom a very pale blue color. This is news to Luke if he is reading this :-P So hopefully he will go along with it if I do all the work! I'll need something to keep me busy the first week of break anyway, right? ;-) And I've been wanting to give our bedroom a little face-lift for quite awhile now. (Please, Luke? :-P)

Happy Thursday!

Thursday, May 26, 2011

DIY Paper Flowers

One of my New Years Resolutions this year was to complete 6 do-it-yourself projects. I have now completed 4. #1: curtains. #2: Initials in pretty frames. #3: "Bride to be" banner. And I'll be sharing number 4 today!

I had this extra frame lying around my house, and I wanted to do something with it other than just fill it with a picture. So here is what I came up with:
It makes me happy! It's perfect for spring, and feeds my recent obsession with the color yellow :-) I also love that it's so 3-dimensional. The best part was that it was extremely easy to make.

There are so many things you could do with these paper flowers! You could use them as an embellishment for almost anything: headbands, hair clips, bookmarks, pins...the possibilities are endless.

I found the tutorial at my favorite design/craft website ever: Jones Design Company. and HERE is where I found the tutorial for the flowers. PLEASE check it out...she did something so cute with the flowers!!

Next do-it-yourself project on my list to tackle? The wall stencil in my bedroom. I quit when I was halfway finished, and am now regretting my decision to ever start it. Oh well, too late now!

Happy Crafting!